yQRCode
Description�
The yQRCode is a scannable code that is typically used to store URLs or other information that can be read by a smartphone's camera. The yQRCode is versatile and can be used for:
- Quickly directing users to websites
- Simplifying the check-in process at events
- Sharing Wi-Fi credentials effortlessly
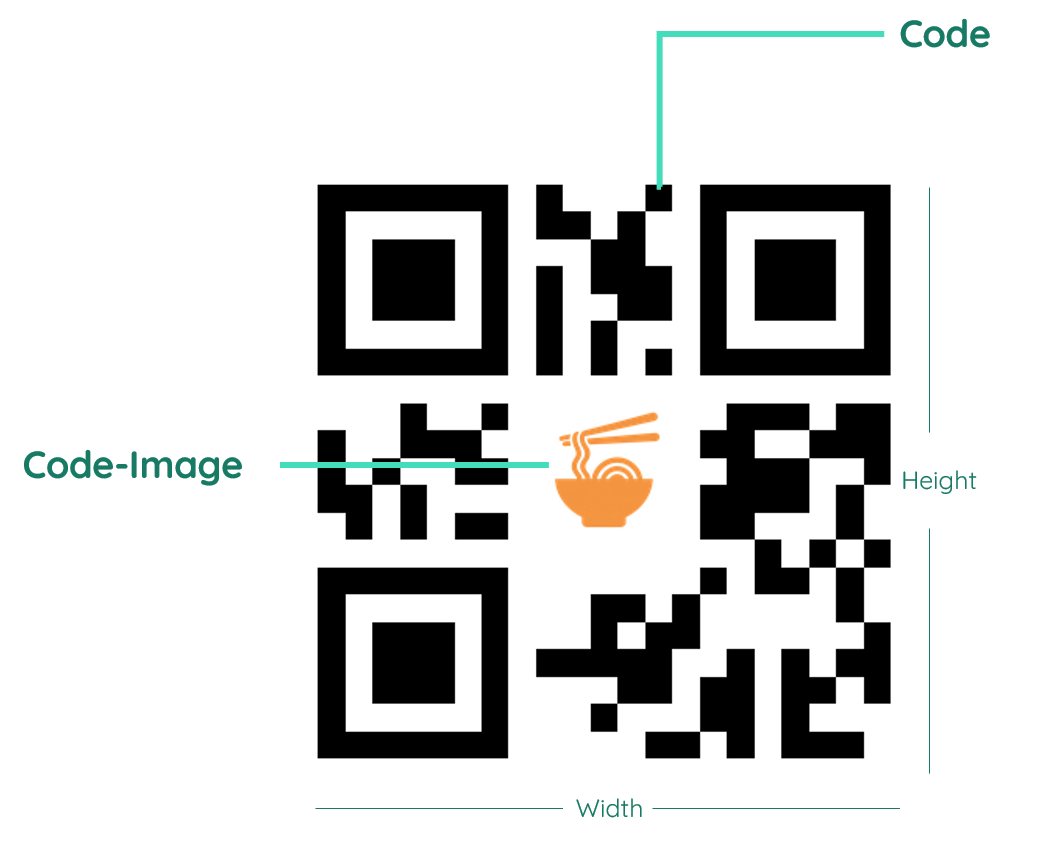
Basic Structure
The basic structure of the yQRCode includes customizable options such as the QR code's color, size, and the actual data encoded within it. For the general structure of a yComponent, refer to the yBase-components basic-structure.
Properties
Through its various properties the yQRCode can be configured to suit your needs. The display below provides you with an overview of all the yQRCode properties.
Properties can be changed directly through three methods:
- Inside the Toolbar, which is positioned in your workarea next to your component right where you need it. It shows the most important properties, thus providing a fast and efficient way to configure your component in the most basic way.
- It may also occur in the Toolbar Extension, which is a seamless extension accesible as a dropdown item of the Toolbar. It extends the functionality of the Toolbar by providing advanced pickers for the most used properties.
- Inside the Detail Panel, which is located in the righthand drawer. Every property of a component can be configured here.
- Generic
- Style
- Links
METAread more
The identifier of the component that is unique within a page.
The type of the component. For this component it is -q-r-code.
The custom name of the component. It serves for better identification of the component.
The custom version of the QRCode-component. This can be used to ensure that all components work well together.
The CoreTheme, which will be apllied to the QRCode. For further information on themes visit the themes page.
The subtheme subordinated to the previously specified CoreTheme, which will be apllied to the QRCode. For further information on themes visit the themes page.
The group theme is a further variation of the subtheme which is specified especially for variations of a component inside the subtheme. For further information on themes visit the Theme-Manager page.
DISPLAYread more
This property specifies the display behavior of the component. This can be be set to:
- none
- block
- flex
- inline
This property specifies the type of positioning method used for the component. This can be be set to:
- static
- relative
- absolute
- sticky
- fixed
This property can toggle the visibility of the component. The two modes are completely hidden and fully shown.
SIZEread more
The minimum value for the width of the component. This can be set in:
- px
- pt
- em
- vw
- vh
- %
The minimum value for the height of the component. This can be set in:
- px
- pt
- em
- vw
- vh
- %
The value for the width of the component. This can be set in:
- px
- pt
- em
- vw
- vh
- %
- auto
The value for the height of the component. This can be set in:
- px
- pt
- em
- vw
- vh
- %
- auto
The maximum value for the width of the component. This can be set in:
- px
- pt
- em
- vw
- vh
- %
- none
The maximum value for the height of the component. This can be set in:
- px
- pt
- em
- vw
- vh
- %
- none
The flex property sets the length on flexible items. This sets the value in n-fold shares extrapolated to all other components with the flex display within the same container.
PLACEMENTread more
This property creates a space around the component, outside of the top border. This can be set in percent or pixels.
This property creates a space around the component, outside of the right border. This can be set in percent or pixels.
This property creates a space around the component, outside of the bottom border. This can be set in percent or pixels.
This property creates a space around the component, outside of the left border. This can be set in percent or pixels.
This property creates a space within the component, inside of the top border. This can be set in percent or pixels.
This property creates a space within the component, inside of the right border. This can be set in percent or pixels.
This property creates a space within the component, inside of the bottom border. This can be set in percent or pixels.
This property creates a space within the component, inside of the top border. This can be set in percent or pixels.
BACKGROUNDread more
The color of the background. This can be set as a color from a palette or a custom hex color.
BORDERread more
The color of the top border. This can be set as a color from a palette or a custom hex color.
The style of the top border. This can be be set to:
- solid
- dotted
- dashed
- none
The width of the top border. This can be set in percent or pixels.
The color of the right border. This can be set as a color from a palette or a custom hex color.
The style of the right border. This can be be set to:
- solid
- dotted
- dashed
- none
The width of the right border. This can be set in percent or pixels.
The color of the bottom border. This can be set as a color from a palette or a custom hex color.
The style of the bottom border. This can be be set to:
- solid
- dotted
- dashed
- none
The width of the bottom border. This can be set in percent or pixels.
The color of the left border. This can be set as a color from a palette or a custom hex color.
The style of the left border. This can be be set to:
- solid
- dotted
- dashed
- none
The width of the left border. This can be set in percent or pixels.
The radius of the corners of all the borders. This can be set in percent or pixels.
SHADOWread more
The shadow of the component. This is set by the 4 sub-properties x, y, blur and spread of the shadow-property, which can be further read about in the shadow-property section.
OPACITYread more
The opacity of all colored parts of the component. This value is set in percent.
CODEread more
Lorem Ipsum ???
Lorem Ipsum ???
Lorem Ipsum ???
QRCODEread more
The source where the qr-code will be loaded from. ???
Usage
In this section you will find a collection of application scenarios and examples that illustrate how to leverage the yQRCode in ways that deviate from its standard behavior, as defined by yBase. This section aims to inspire and guide you through various possibilities, helping you to implement more complex or unique functionalities tailored to your specific needs. General properties that are universally applicable can be found in the yBase usage section.
Variations
- Elevated
- Flat
- Outlined
- Rounded
- Plain
Style Variations
- Red QR Code
- White QR Code
Dynamic Content
The yQRCode also supports dynamic content, where the data encoded in the QR code can be updated in real-time based on user interactions or other events in the application.
Simple update
To set the yQRCode's value using JavaScript, access the value property within the Style > Code category. This method is ideal for changing the yQRCode's state based on user interactions or other events within your application.
Code example:
// function onButton_2_EvtClicked (apiObject, component, eventData) {

let desiredString = "https://example.com";
let QRComponent = apiObject.ui.getObject(2, "y-qr-code");

QRComponent.set("style", "code", "code__value", desiredString);

//}
Dynamic update
Simply replace the desired string with the appropriate string or URL to a website that you would like to encrypt in the QRCode.
In the following more advanced example, a yInput named yInputUrl and a yQRCode named yQRCode are required. The content of the following code example can be run from any function that is triggered inside the page that contains those two components.
// function onInput_3_EvtChanged (apiObject, component, eventData) {
// Retrieve the user input value from an input component
let urlValue = eventData.data;
const qrComponent = apiObject.ui.getObject(2, "y-qr-code");

// Check if the URL is not empty
if (urlValue.trim() !== "") {
  // Update the QR Code component's content
  qrComponent.set("style", "code", "code__value", urlValue);
  console.log("QR Code updated with URL:", urlValue);
} else {
  // Handle empty input, potentially showing an error or alert
  console.error("URL input is empty. QR Code cannot be updated.");
}
//}
Via SourceLink Picker
To link the yQRCode’s value with another component (e.g. a yInput), use the SourceLink Picker. This feature binds the yQRCode’s state to another component's value, allowing for integrated component behavior.
How to:
- Create a yQRCode component in your application.
- Create a new yInput aswell.
- Select the created yQRCode and open the Detail Panel.
- Within these settings, proceed to the Links section and open QrCode.
- Create a new SourceLink -> select the yInput you just created and choose
input-stringas an event.
Now each time you insert a url into the input, the image will render the picture behind this url. You can implement a validation in the yInput to make sure the string is in a format that you want, e.g. a valid URL.